
Occasionally I have the need for a network card to operate as though it has a live network connection, without it actually being connected to a network. Typically for testing purposes, and occasionally for specific software configurations. To do this I needed a quick and easy way to make a loopback connector. Something small enough to keep in my PC toolkit, yet large enough that it wouldn’t be lost. Mine ended up about the size of a ballpoint pen. The following is a quick “how to” for making an Ethernet loopback connector.
To build this particular loopback connector you will need one (1) spare Category 5e (cat5) cable.
- Cut 4 or 5 inches of the end off a network cable, keeping the connector intact.
- Cut away two inches of the main sheath covering the eight wires. (Be careful not to cut the wires inside.)
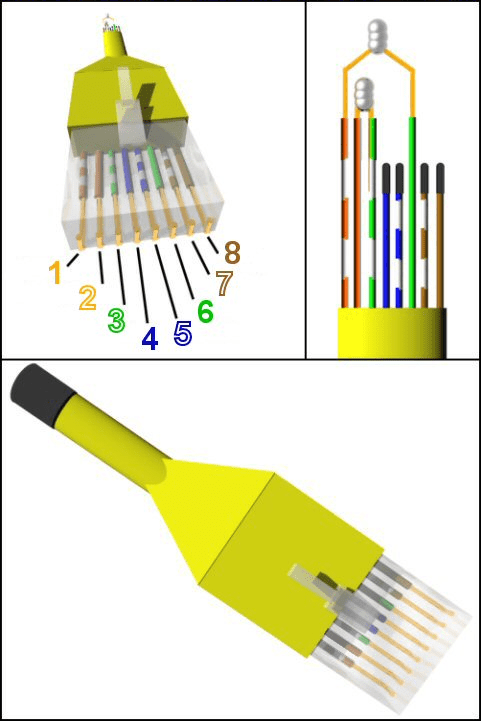
- Cut the sheath on Orange-White (1) and Green (6) and twist them together. Tape this pair. (Soldering is optional and preferred)
- Cut the sheath on Green-White (3) and Orange (2) and twist them together. Tape this pair as well. (Soldering is optional and preferred)
- Leave the other four wires alone. (Optionally tape these down to prevent cross talk*)
- Tape the end down to make it look presentable.
- Plug RJ-45 plug into your Network Card.

*For a Gigabit Ethernet Loopback you will also need to connect the other four wires as follows:
- Cut the sheath on Blue-White and Brown-White and twist them together. Tape this pair. (Soldering is optional and preferred)
- Cut the sheath on Blue and Brown and twist them together. Tape this pair as well. (Soldering is optional and preferred)
Updated April 19, 2011 – Added Gigabit Loopback Information.
You did a very nice 3D work out there, but you put the wires in the wrong order.
When you are using T568B standard, wiring layout should be:
1. Orange-White
2. Orange
3. Green-White
4. Blue
5. White-Blue
6. Green
7. Brown-White
8. Brown
Have a nice day!
Nice work, also after soldering you can protect the soldered points using a hot glue gun, tape is good but sometimes the insulation tape peels off which isn’t a great thing, hot glue can last for ages and is a good insulator.
I can’t think of any reason not too, it’s pretty low power. I use heat shrink tubing on mine usually.
On a standalone Windows XP machine, I can use this cable and type IPCONFIG to see my static IP address. However, under Windows 7, IPCONFIG shows no IP address. How can I make Windows 7 report the static IP address?
The Windows 7 machine had a 1 GB/sec ethernet card. Configuring the ethernet for 100 MB/sec solved the problem.
Nice 3D work but then you connected the wrong pairs from what your description is saying.
Description connect 2-6 diagram shows 1-6…
Description connect 1-3 diagram shows 2-3
Thanks. The numbering in the text description was incorrect. The error has been corrected.